
How to Make a Biscuit Joint
VIDEO: How to make a biscuit joint
The Family Handyman editor, Ken Collier, explains the basics of using a biscuit joiner—a great tool for building cabinets, bookshelves and other woodworking projects.
Biscuit Basics

Meet the expert
Ken Collier is Editor in Chief at The Family Handyman, and is a former cabinetmaker. His kitchen cabinets are all held together with biscuit joints.
It’s easy to fall in love with biscuit joints—they’re so fast and easy. At least they are when you get the hang of them. If you’re new to biscuit joinery, you can learn here how to do the four basic woodworking joints. Even if you already own a biscuit joiner (or plate joiner—same animal), I’m sure you’ll pick up a tip or two.
If you want to get started using biscuits (or “plates,” as they’re sometimes called), you can pick up an entry-level machine for about $100. Five minutes of fooling around with the machine or a little time with our online videos and you’ll have the basic idea: Use the machine to cut slots in both parts, and then add glue to each, insert a biscuit, clamp to hold, and you’re done. Your tool manual will show how to adjust the tool.
The cool thing about biscuit joinery is that the biscuit is made from compressed wood. The biscuit fits loosely in its slot, which makes assembly easy, but it expands after the glue has had a few minutes to soak in, so it fits extremely tight. You have a little window of time when the two pieces you’re joining can be slid sideways into perfect alignment. Biscuit joinery may not be for the DIYer who’s just building one cabinet, but if you have a lot of cabinets in your future, a biscuit joiner is a great tool to own.
Making Cabinet Boxes With T-Joints
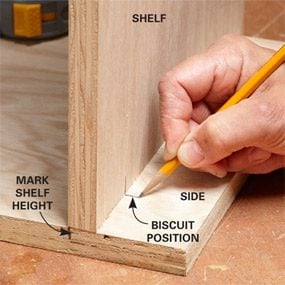
Photo 1: Mark the biscuit
First, mark the height of the shelf on the cabinet side, then stand the shelf up and mark the location of the biscuit slots on both pieces. 
Photo 2: Cut the shelf slots
Clamp the pieces together, rest the joiner on the cabinet side and cut the slots in the shelf. 
Photo 3: Cut the side slots
Now flip the joiner upright and cut the matching slots in the sides.
This is where joinery shines: the T-joint, where a fixed shelf meets the sides of a cabinet (Photos 1 – 3). The sideways wiggle room that biscuits give you allows you to get the edges of the shelf and the sides perfectly flush, and the case looks good, with or without a face frame, both inside and out. And since the glue is all on the biscuits, there’s rarely any squeeze-out to clean up.
The process for making a T-joint begins with marking on the edge of the sides where the top of the shelf should be. Stand the shelf in position and mark the biscuit locations. Then lay the shelf on its side, lined up with its location mark. Clamp the side and shelf together and to your bench, with the edges flush to each other. Now cut your biscuit slots, first in one piece, then in the other. Do the other side of the cabinet the same way, making sure the shelf is oriented the right way: front to front, bottom to the bottom.
VIDEO: How to Make a T-Joint With a Biscuit Joiner
The Family Handyman editor, Ken Collier, shows you how to make a T-joint for shelves in bookcases or cabinets. This basic technique will give you strong, reliable shelves and it’s an easy joint to master.
Making Cabinet Boxes: L-Joints
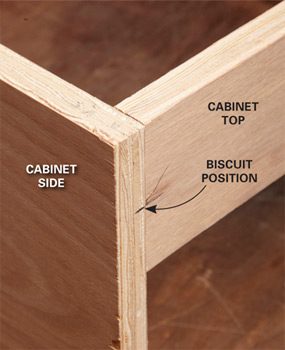
Photo 4: Use L-joints at corners
On the corner of a cabinet, use an L-joint. Mark the biscuit positions as shown. 
Photo 5: Cut slots in the top
Cut the slots, using the fence to register the slot from the top surface of your piece. 
Photo 6: Cut slots in the side
Hold the fence down firmly for accuracy. For the sides, give the joiner more support by clamping both sides of the cabinet together.
Biscuits are also a great way to make an L-joint, for example, to join a cabinet top to the sides (Photos 4 – 6). For this kind of joint, you usually want to have the outside edges flush, without a little step. So use the fence to ensure the pieces are flush on the outside. When you’re using the fence, be certain your workpiece extends completely off the edge of the workbench. Also, press down firmly on the fence to make sure the slot is cut properly; it’s easy for the fence to be tipped.
VIDEO: How to Make an L-Joint With a Biscuit Joiner
The Family Handyman editor, Ken Collier, shows you a great technique for putting a top on a bookcase. Making an L-joint with biscuits will give you a strong top on many woodworking projects.
Fence or no fence?
The joiner is designed to be used two ways: You can have the fence down, which allows you to align the biscuits to a surface that faces up, that the fence rests on (Photos 5 and 6). You can also fold the fence in, which allows you to align the biscuits with the bottom of the tool (Photos 2 and 3). The trick is to figure out which one to use, then use it consistently.
Imagine you’re joining two pieces of different thicknesses edge to edge. Using the fence allows you to get the top surfaces flush; using the bottom of the joiner (no fence) allows you to get the bottom surfaces flush. When you use a joiner without the fence, the slot is centered in 3/4-in. material. For any other spacing, you need to use the fence.
VIDEO: How to Glue Biscuit Joints
The Family Handyman editor, Ken Collier, shows you how to glue and clamp biscuit joints for a strong and nearly invisible joint.
Making Face Frames
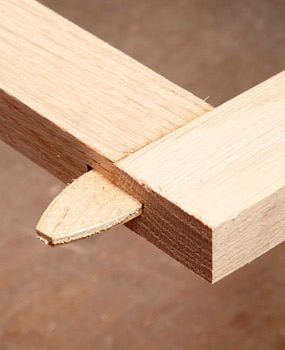
Trim the biscuit for face frames
For narrow pieces like a face frame, just let the slot run out the side that doesn’t show. 
Hold in place while cutting
To support the piece you’re cutting, make a simple support jig from a scrap of face frame attached to a base. Keep your hands well away from the joiner, or use clamps.
Plate joinery is a fast way to make face frames. It’s also a convenient way if you’re already using the joiner for the cabinet boxes. To join face frames with biscuits, you usually need to let the biscuit extend past the outside of the frame and trim it off. Just be sure you’ve got your face frame pieces supported, since they’re usually narrow (Photo 8). I like to line up the middle of the biscuit, and the mark on the joiner, with the edge of the face frame so half the biscuit is being glued. Of course, on wide rails you can sometimes use the entire biscuit.
Biscuit Joints for Edging Plywood

Photo 9: Mark the slots
First, mark the slot locations with both pieces upside down on the workbench. 
Photo 10: Offset the joiner
When you cut slots in the edging, put thin cardboard or a few pieces of paper under the joiner. 
Photo 11: Sand the edges flush
The edging will be slightly above the surface of the plywood when you glue it on. This gives you a small, safe amount to sand off without damaging the plywood.
If you’re gluing solid wood edging onto plywood, biscuits can make it a success (Photos 9 – 11). If you try to glue the edging on perfectly flush, a small section inevitably ends up lower than the surface of the plywood, which is a disaster. The trick is to leave the solid wood a fraction above the surface of the plywood, then sand it flush. The plate joiner makes it easy.
Required Tools for this Project
Have the necessary tools for this DIY project lined up before you start—you’ll save time and frustration. [project-tools]
Required Materials for this Project
Avoid last-minute shopping trips by having all your materials ready ahead of time. Here’s a list. [project-materials]


No comments